Fill With Background

When creating mockups, you may need to take a screenshot of an existing dialog or webpage and then modify it for a new design. You’ll probably also have to paint over an existing element in the screenshot, like a button label, to replace it with new text. So you select a portion of the background pixels in the screenshot, copy them, paste them, stretch them over the element you want to replace, and then flatten the pixels with the original image. The Fill With Background command does all of this in just one step.
Filling a marquee selection
There are a few different ways of using the command. The simplest is to select a bitmap and create a marquee selection over the area you want to replace. When you run the command, a strip of pixels immediately to the left of the marquee will be copied from the background and then stretched over the area defined by the marquee. These new pixels are pasted into the bitmap itself, so you’re left with a single flattened bitmap.
By holding shift while dragging, you can create several separate marquee selections simultaneously. When you run the command, each of these marquee areas will be filled with the nearby pixels.
After Fill With Background is run, the original marquee selection will still be active. If you then re-run the command, the same areas will be filled again, but this time with the row of pixels immediately below each area. This is useful when the pattern of the background repeats verticaly instead of horizontally, such as on a vertical toolbar or scrollbar. By re-running the command with the same selection, you can toggle between the two fill directions.
Filling a rectangle
In addition to a marquee selection, you can use a rectangle (or really any element) to define the area to fill with the background. If you use the Keyboard Resize commands, it can often be more convenient to just draw a quick rectangle and size it accurately via the keyboard rather than fiddle with the mouse to get the marquee selection just right.
Once you have one or more rectangles defining the areas you want to fill, select them and the background bitmap and then run Fill With Background. The areas defined by the rectangles will be filled with the background pixels.
Note that the rectangles must intersect the background bitmap element. If any of the rectangles doesn’t sit on top of the bitmap, the command will display a warning.
Filling from a locked background
Background elements will often be placed on locked layers, which can be a pain to unlock and relock just to copy some pixels. With this command, though, you don’t have to unlock anything. Just create a marquee selection or position a rectangle over the area you want to fill and run Fill With Background. The designated area will be filled with pixels from a flattened version of the entire document. The background will remain locked.
Note that since there is no source bitmap selected as part of this scenario, the filled area will not be flattened into the background bitmap. A separate bitmap the size of the filled area will be created instead.
Filling from a non-bitmap
Say you have a rectangle with a linear gradient fill and you want to copy a portion of it. Instead of flattening it into a bitmap and then copying the pixels, you can just position another rectangle on top of it, select both, and then run Fill With Background. The topmost rectangle will be filled with the background pixels, and the background rectangle will remain as a path, rather than a bitmap.
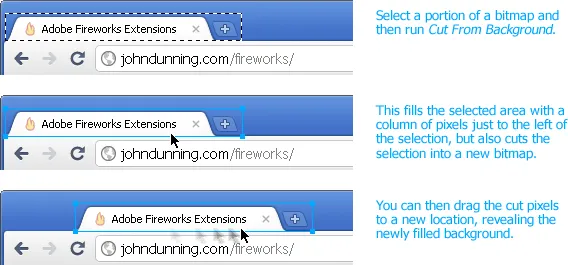
Cut From Background
Sometimes you need to move an icon or button in a screenshot to a new location, filling in the element’s original location with background pixels. Even with the Fill With Background command, this is a multi-step process. The Cut From Background command does it one shot.
Just select the area you want to cut and then run Cut From Background. The selected pixels will be copied into a new bitmap, while that area in the source bitmap will be filled with background pixels. This makes it very easy to pick up a button and move it to a new location.
Unlike Fill With Background, you can’t run Cut From Background a second time to fill the background with a row of pixels rather than the usual column. Instead, use the Cut From Background Vertically command when you need to cut an area from a vertical gradient, such as in a scrollbar.
Limitations
Fill With Background can be pretty handy, but it does have some limitations. It works only when the background you want use as a fill is either a solid color or a perfectly horizontal or vertical gradient. Thankfully, these are quite common in UI elements, which are often created in the first place by stretching a row of pixels horizontally or vertically to fill an area.
Also note that if you have a non-rectangular marquee selection, the area that is filled with the background pixels will still be a rectangle.
Release history
- 0.2.0
- Added the Cut From Background command.
- 0.1.0
- Initial release.