Greeked Text

When creating wireframes, it’s often useful to suggest the presence of text without using actual words, which can distract the viewer from the overall layout. Even “lorem ipsum” dummy text requires the selection of a typeface and size, which may be too much detail for the mockup. In hand-drawn mockups (does anyone still draw by hand?) you could use a marker to draw lines of different lengths to suggest text, but this effect has always been a pain to create with software. The Greeked Text1 auto shape makes it easy.
Creating a Greeked Text auto shape
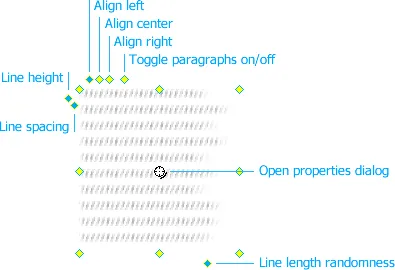
To create a Greeked Text shape, find it in the Shapes panel and drag it to the canvas. Horizontal rectangles of varying widths are displayed within the bounds of the shape to simulate a block of left-justified text. The auto shape has 8 yellow control points around its perimeter. Dragging one of these resizes the shape from that edge or corner. As you drag, rectangles are added or removed to fill the shape, and each rectangle’s width is re-randomized. If you want a different rag on the text, just click a yellow control point without dragging to randomize the lines again.
Controlling line height, spacing and length
The two blue control points on the upper-left side of the shape (the blue diamonds, not the blue squares) control the size and spacing of the lines. The upper control point adjusts the line height and the one below and slightly to the right of that adjusts the line spacing. As you drag the height or spacing control point, the number of lines in the auto shape will adjust to accommodate the new values.
The control point on the bottom-right of the shape adjusts how random the line lengths are. Drag it to the left to let the lengths vary widely and to the right to keep them more even. You can drag it all the way to the right to force the lines to all be the same width.
If you press and hold ctrl (command on OS X) before clicking one of these points, they will move only half as fast as the speed at which you drag the mouse, making it easier to make precise adjustments.
To have the Greeked Text auto shape match a particular font size and line spacing, such as 11px Tahoma with 16px leading, set the value of its line height + line spacing equal to the text block’s leading (16 in this case). Setting the shape’s line height to the distance from the font’s baseline to the top of the ascenders (9px for 11px Tahoma) usually gives a good approximation of that text size.
Controlling text alignment
The three control points above the upper-left corner of the shape control the “text” alignment. The blue control point indicates which alignment is currently selected.
You will likely want to have more random line widths when the alignment is centered vs. left or right.
Simulating paragraphs
To the right of the 3 text alignment control points is a fourth point. Clicking it will toggle paragraphs on (the control point turns blue) or off (the point turns yellow). When paragraphs are on, a blank space is inserted every few lines in the shape to simulate a paragraph break. The first line of each paragraph can optionally be indented. You can control the number of lines per paragraph and the size of the spacing and indent by clicking the central control point to open the properties dialog, as described below.
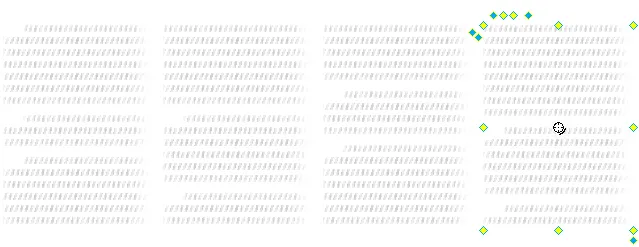
Here is an example of Greeked Text auto shapes with paragraphs turned on to simulate a multi-column text layout:
Properties dialog
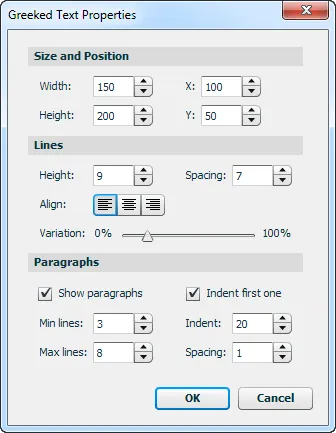
Click the crosshair in the middle of the Greeked Text shape to open its properties dialog, which offers precise numeric control over the shape’s attributes, as well as additional options that are not available as control points.
Size and Position
In the upper section of the dialog, you can enter a specific size or position for the shape. While you can use the Properties panel to adjust the shape’s X/Y position, you should always adjust its size by directly dragging its control points or by opening its properties dialog. Using the Properties panel or the scale tool to resize the shape will distort it.
Lines
The line height, spacing, randomness and alignment controls described above are also available in the dialog.
Paragraphs
The bottom section of the dialog offers controls that are not available as control points around the edges of the shape.
- Variation
- The Min lines and Max lines fields specify how many lines can appear in each paragraph. The shape picks a random number between these two values as it creates each paragraph. Make the numbers farther apart to create more random paragraphs. You can also make them the same value to force every paragraph to have the same number of lines.
- Indent
- The Indent first one checkbox controls whether the first line of the very first paragraph in a shape should be indented. This is checked by default, but you might want to uncheck it to simulate multi-column text, where a paragraph in the first column flows into the second, which then wouldn’t indent its first line.
- The Indent field specifies how many pixels the first line of each paragraph should be indented. This value can be negative, which lets you create an outdented effect.
- Note that paragraph indentation only works when the paragraphs are aligned to the left. Setting center or right alignment will disable the checkbox and field.
- Spacing
- The Spacing field specifies how many blank lines should be left after a paragraph break. This is a multiple of the line height and line spacing values, so as they change, the space between paragraphs also changes. Set this field to 0 if you do not want any spaces between paragraphs.
Adjusting multiple Greeked Text shapes at once
After creating several Greeked Text auto shapes, you may want to adjust, say, the line spacing on all of them. There are a couple different ways to do this. One is to select the shapes, then drag the line spacing control point on one of them. This will update the shape whose control point you dragged, as well as the control points on the other selected shapes. Unfortunately, due to a bug in Fireworks, the other selected shapes won’t redraw to display the new line spacing. To redraw them, you can click a control point on each shape in turn. Or you can run Commands > Greeked Text > Redraw Selection, which updates all of the Greeked Text shapes in the selection.
Another way to edit multiple shapes at once is to select them and then run Commands > Greeked Text > Edit Properties. This opens the Greeked Text Properties dialog showing the properties of the top-most shape in the selection. Change one or more properties and then click OK. All of the shapes in the selection will immediately update to show the new properties, since this command can work around the abovementioned Fireworks bug.
Changing the default values
Every time you modify a Greeked Text shape, its current settings are saved as the default for the next one that’s created. So if you drag in one shape, change its line height to 10, then drag in a second shape, the second one will also have a line height of 10. These defaults will persist across Fireworks sessions.
Pre-defined Greeked Text shapes
There are a few pre-defined Greeked Text auto shapes that come with the extension and can be inserted by running a command, such as Insert - Grey - Height 9px - Spacing 7px. This inserts a 50% grey shape with the line height already set to 9px and the spacing to 7px. The Insert - Hatched - Height 9px - Spacing 7px command inserts a shape that has some textures and effects applied to it to make the bars look more like actual lines of text.
Greeked Text auto shape tool
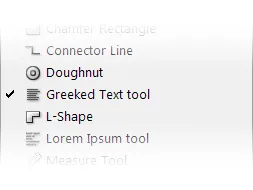
In addition to dragging a Greeked Text auto shape from the Auto Shapes panel, you can also use the Greeked Text tool in the Tools panel to create dummy text. Click and hold the Rectangle button in the panel to show a list of other shape tools, then select Greeked Text. With the tool selected, drag out a rectangle and then release the mouse to insert a block of lines with the same size and position as the dragged rectangle.
Other uses for the auto shape
If you need a series of evenly spaced rectangles or squares, the Greeked Text auto shape can be of help, especially if you want to directly manipulate the size, spacing and number of rectangles. Just drag the line randomness control point all the way to the right to make every line the same width. Use the line height control to adjust the height of each rectangle, and drag a side control point to adjust the width of the each rectangle. If you want a horizontal series of rectangles, rotate the shape 90 degrees.
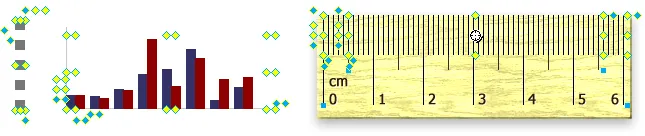
You can also make a quick-and-dirty mockup for a bar graph just by rotating the Greeked Text shape 90 degrees counter-clockwise. Or if you needed to mock up a ruler for some reason, you could use two shapes with negative paragraph outdents and a fixed set of lines per paragraph to draw the millimeter and centimeter markings.
Lorem Ipsum auto shape
If you really do want Lorem Ipsum-style dummy text, the Lorem Ipsum auto shape provides similar functionality to the Greeked Text shape. Resizing the auto shape adds or removes text to fill the size of the rectangle, which makes it much easier to adjust the size of a block of dummy text without having to manually add or remove the words.
Release history
- 1.2.1
- 2013-03-11: Added support for pressing shift-up/down-arrow in the numeric fields to change the value by 10.
- 1.2.0
- 2013-02-23: New version supports simulating left-aligned paragraphs, each with bottom margins, optional indents and a random number of lines. Added a dialog to set all of the properties of a shape. Added an Edit Properties command to edit multiple shapes at once.
- 1.1.1
- 2012-05-27: Minor update to fix error dialog that could appear when dragging the shape onto the canvas.
- 1.1.0
- 2012-05-14: Added a Greeked Text auto shape tool. Enabled the [Keyboard Resize][1] extension to resize Greeked Text shapes. Added controls for aligning the lines of “text” to the left, right or center. The last-used settings are now saved automatically for the next auto shape that’s created.
- 1.0.0
- 2009-04-28: Initial release.
Footnotes
-
Note that by “Greeked text” I’m referring to the representation of lines of text by plain bars, rather than actual typographical characters. This has commonly been done in word processors and desktop publishing programs when there is too much text to render quickly, as well as in hand-drawn mockups using markers. The “lorem ipsum” text that is often used as a placeholder is derived from a passage of Latin by Cicero, and is more properly called dummy text. More can be found at: http://www.creativeglossary.com/graphic-design/greeked-text.html ↩