Spacer
The Spacer panel makes it easy to arrange rows or columns of elements by adjusting the spacing between them. When you select some elements, the panel figures out if they’re mostly horizontal or mostly vertical. It then displays the horizontal or vertical space between each element in a series of text fields, which you can edit to easily adjust the spacing.
The panel is fairly wide, but short, so be sure to resize it when you first open it. A good place to position it is in the upper-right corner of your workspace, over the empty expanse of toolbar.
Modifying the spaces between elements
The Spacer panel shows only one field per unique space. For example, let’s say you select a row of 5 elements and the first 4 are spaced 10px apart but the last one is 12px. The panel will show two text fields: 10 and 12. If you focus the second text field, type 15 and then press enter, the last element will shift right by 3px.
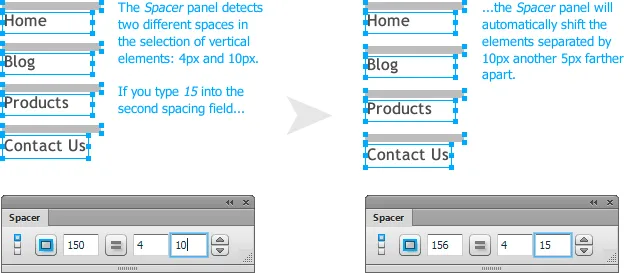
Another example is shown above, in which a navigation menu displays a bar over each labeled section of a website. Each label is 4px below its bar, and each bar is 10px below the preceeding label. So selecting the column of elements displays two text fields, one containing 4 and one containing 10. This makes it easy to adjust the spacing between the navigation elements without affecting the spacing bewteen each bar and label.
Note that if there are two spaces with different values, and you set one of them equal to the other, they will immediately collapse into a single text field.
Entering space values
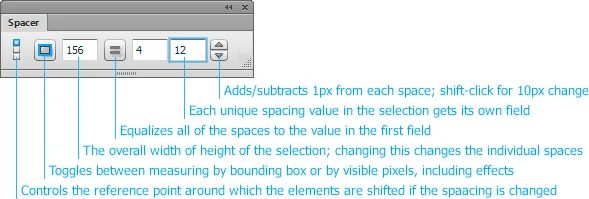
When a text field is focused, pressing the up or down arrows will increment or decrement that space by 1. Holding down the shift key will change the value by 10. If you type in a new value, press enter to apply it.
The up/down arrows to the right of the text fields adjust all of the spacings individually. So in the example above, if you clicked the up arrow twice, the spacings would then be 12 and 14. Hold down the shift key to adjust the spacings by 10px per click.
The keyboard focus will remain in the text field after you change a value, letting you tab to other fields to continue making changes. To switch the keyboard focus back to the Fireworks document, click somewhere outside the panel or press Esc.
If you want all of the spacings to be the same, click the button with the equals sign on it. This will adjust the elements so they’re identically spaced. The value of the text field that last had focus is used to equalize the spacing.
Changing the width or height of the selection
The left-most text field shows the overall width or height of the selected elements. You can also change this to adjust the element spacing. The panel will move the elements so that their total width or height is exactly the value that you specify. This operation maintains the relative size of the spacings. For instance, if some elements are 10px apart and some are 20px, changing the width will maintain that 1:2 ratio.
Note that the panel always rounds the calculated spaces down to whole pixels, so after setting a width or height and pressing enter, the space may change to a slightly smaller value.
Selecting the reference point
The left-most button bar controls the reference point around which the elements are shifted. The button bar is oriented in the same direction as the selection. By default, if the elements are in a horizontal row, the left-most element stays where it is when the spacing is changed. Click the right-most button in the reference point control to make the right-most element stay put and shift the rest leftwards. Click the center button to keep the selected elements centered as you adjust their spacing.
If the selected elements are stacked vertically, you can control whether the top- or bottom-most element stays put.
When you change the reference point, that selection is stored on the selected elements. The next time you select those elements, the control will default to the last-used reference point.
Measuring bounding boxes vs. pixels
The second button from the left controls whether the spacing is calculated based on the element coordinates as shown in the Properties panel or their actual pixel size, including borders that extend outside the element boundaries or filters like drop shadows and glows. By default, the spaces are calculated based on the elements’ bounding boxes. Click the button to toggle between the two ways of measuring.
In the bounding box mode, the space bewteen text elements is actually calculated using the “raw” text bounding box, which is 4px smaller in each direction than what is shown in the Properties panel. When using pixel mode, keep in mind that the vertical spacing between text elements will vary depending on whether the text has ascenders or descenders.
Spacing elements inside a group
Normally when you select a single element, the Spacer panel will be disabled, as there’s nothing to space. However, if you select a single group that contains more than one element, the panel will display the spaces between that group’s child elements. This can be very useful for quickly changing the spacing between a row of icons that you’ve grouped together.
Note that live filters applied to a group show up on the group’s children, but those pixels will not be taken into account when calculating the spacing in pixel mode. The Spacer panel only sees the filters applied directly to the children.
Release history
- 0.1.4
- 2013-04-06: When the equalize button is clicked, the last focused text field is used as the value.
- 0.1.3
- 2013-02-11: Fixed a bug in 0.1.2 that threw an exception when the current file was saved.
- 0.1.2
- 2013-02-11: Fixed bug that added extra undo steps when a single group was selected. Now also restores the last-used reference point based on the selected elements.
- 0.1.1
- 2012-10-25: Added support for showing the spacing of elements inside a group. Added icons for the panel.
- 0.1.0
- 2012-10-16: Initial release.