Create Symbol From States
Rich symbols are a powerful feature of Fireworks, but creating them is a fairly complicated process. The Create Symbol From States command lets you create basic rich symbols containing multiple states in just one step with no scripting.
The symbols created by this command can switch between displaying different states, controlled by a State menu in the Symbol Properties panel. Say you’re mocking up an IM buddy list, and each person in the list has an icon showing whether they’re online, offline, busy, or idle. This command can turn the icon into a symbol that lets you easily switch its state using the properties panel. It will also make any text elements on these states editable via the Symbol Properties panel.
Creating the source document
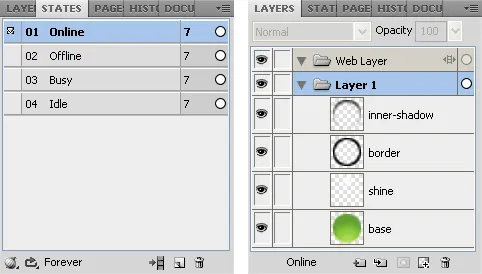
First, create a new Fireworks document. In the States panel, add the states you want the symbol to have, and give each one a name. The names of the states will appear in the State menu in the Symbol Properties panel when the symbol is selected.
On each state, add whatever elements you want to display when that state is selected. You can use the onion skinning feature in the States panel to check the alignment of the elements across the states. Note that hidden elements will not become part of the symbol, but locked elements and layers will.
The States and Layers panels of the example buddy icon document might look like this:

Creating the symbol
Once the states have been filled in, run the Create Symbol From States command. It will first display a dialog box to select a folder in the Common Library in which you want to store your new symbol. Remember that a symbol has to be stored within a sub-folder of the Common Library folder for it to appear in the panel.
Next, enter a name for the symbol. This name will also be used for the file, so if you enter My Icon, for instance, the document containing the symbol states will be saved as My Icon.graphic.png in the Common Library. The script that specifies how the symbol behaves will be written out to the same location with the same name, e.g., My Icon.jsf.
Once the symbol name has been entered, the command will add a new initial state called Symbol to the document and copy the contents of each of the other states to the new one. The new symbol will be created on this first state.
Note that even though the Symbol Properties panel shows controls for this newly created symbol, it isn’t a “rich” symbol yet. You need to drag an instance of the symbol from the Common Library panel to make its controls work, as described next.
Also, if your symbol has an odd width or height, a transparent rectangle with an even size will be added to the symbol. This works around a bug where dragging a symbol from the Common Library panel can cause any rectangles inside it to shift by half a pixel if the overall symbol size is odd, leading to blurry borders. The extra element is called [SIZE FIXER] and is locked, so it won’t interfere with selecting the symbol elements when you edit them.
Using the symbol
After the command is finished, you can drag an instance of your new symbol from the Common Library panel into another document. When the symbol instance is selected, the Symbol Properties panel will display a single State menu control. You can change this menu to choose which state of the symbol to display.

Editing the symbol
There are a couple ways of editing the symbol once it’s been created. One way is to open the symbol file in the Common Library, e.g. My Icon.graphic.png, and then edit the states. When you’ve made the necessary changes, just run the Create Symbol From States command again, which will create a new symbol from the states. You won’t have to select a folder or name if you run the command on an existing symbol file.
If you want to update the symbol in the documents where you’ve used it, you’ll need to drag the symbol in from the Common Library panel again. Select the Replace existing items option in the dialog to update the existing instances in that document.
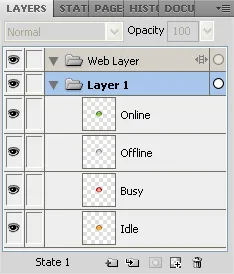
The other way to edit the symbol is directly in a document where you’ve used it, by double-clicking an instance. In the symbol edit mode, the Layers panel will show a list of groups, one for each state in the symbol. For instance, the panel for the buddy icon symbol might look like this:

To edit one of the states, modify the contents of the group that represents it. You may find it helpful to hide the other layers in the symbol while you’re dealing with a particular group. If you ungroup a “state”, remember to regroup its elements when you’re done editing and give the group the same name as before. Otherwise, that state will disappear from the State menu and its contents will always be visible. The Smart Ungroup command can be useful for ungrouping and regrouping elements while maintaining the group names.
You can reorder the groups to change their order in the State menu, or rename a group to rename that state. You can also add or remove states just by adding or removing groups in the symbol. When you exit the symbol editing mode, the Symbol Properties panel will update to reflect the new list of groups.
Making editable text elements
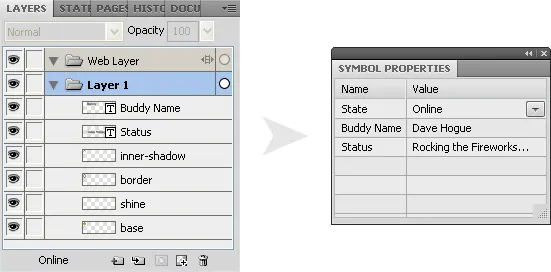
Any named text elements that appear on the states will be made available as editable text fields in the Symbol Properties panel. For instance, if you’re creating a button and have a text element on each state called Label, a text field called Label will appear in the symbol panel after running the command. Changing the Label property in the Symbol Properties panel will change the text of each element with that name on every state (though only the text element for the current state will be visible at any given time).
Keep in mind that you must manually name the text elements in order to make them editable. If you create a text element that contains the characters Label, it will appear to be named Label in the Layers panel. But if you double-click it in the panel, you’ll see that its name is still blank. You must double-click the element and give it a name to make it editable.
To extend the buddy icon example from above, you could add text elements for the name of the person and their status message to each state. They will then appear in the Symbol Properties panel:

Note that the styling of the text elements can be different on each state, letting you change, say, the text color on a hover state vs. a down state. The text elements also don’t have to appear on every state. In the buddy icon example, you might want to hide the Status text when the buddy is offline, so just don’t include the text element in that state. Just make sure that text elements that should all show the same string have the same name on each state.
When in symbol editing mode, you’ll see that the text element names are appended with the name of the state they’re from. So in the buddy symbol example you might see Buddy Name_Online, Buddy Name_Offline, etc. When changing the names of states in the symbol, be sure to update the names of the corresponding text elements as well. Also, if you add or remove a text element, after exiting symbol editing mode, you will need to deselect the symbol and then reselect it to force the Symbol Properties panel to update.
If you have text elements that you don’t want to be editable, just wrap them in a group or don’t give them a name. They’ll appear as a static element on their state and will not show up in the Symbol Properties panel. Note that editable text elements will always appear layered on top of the other elements in their state.
Release history
- 0.2.2
- 2013-03-24: Added a dialog for entering the symbol name and folder. Fixed bug that could cause errors when including named text elements in a symbol. Remove sub-layers of the Web Layer so they don’t get imported from the Common Library. Worked around bug with odd-sized symbols causing rectangles to shift by a half-pixel.
- 0.2.1
- 2013-01-28: Fixed handling of locked layers and elements. Ignore hotspots and slices when copying elements to the symbol. Unnamed text elements are displayed after the script runs, so users know which ones won’t be editable.
- 0.2.0
- 2011-09-05: Added the ability to include editable text elements on the states.
- 0.1.0
- 2011-08-28: Initial release.