Generate Web Assets
While you can easily export slices from a mockup, it’s a pain to create an individual slice for each element that you want to export. And if the elements overlap, the slices won’t output cleanly. The Generate Web Assets command makes exporting different parts of your document a breeze.
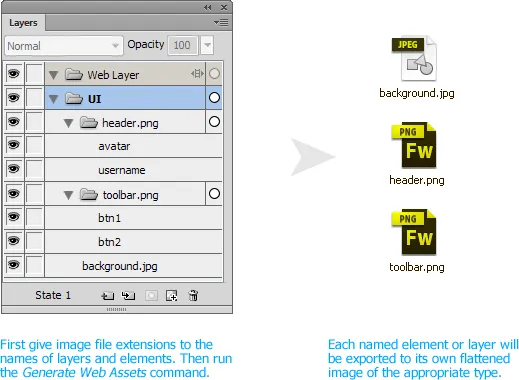
To specify how you want an element to be exported, just change its name to include an image file extension, like header.png. The command will look for elements whose names end in .png, .gif, .jpg, or .jpeg.
It also looks for layers or sub-layers whose names end in an extension. So if you have several button elements on a sub-layer called toolbar.png, all of the button elements will be exported as a single, flattened PNG. Unlike a slice, which you have to resize each time the elements below it change size, the PNG that’s exported for the named sub-layer will always be the exact size of all the child elements.
When you first run Commands > Export > Generate Web Assets on a document, a dialog will appear to let you select the destination folder for the exported images. All of the named elements and layers will then be exported to that folder.
The last-used destination folder is stored in the document, so the next time you run Generate Web Assets, the images will be automatically exported to the same folder. To select a different folder, run the Generate Web Assets - Change Export Location command.
PNGs are exported as 32-bit PNGs, JPEGs are exported using the JPEG - Better Quality export settings, and GIFs are exported with the GIF Adaptive 256 settings and alpha transparency.
Note that if a layer name ends in an image extension, all of the children of that layer are exported as a single image. Any file extensions on the children or sub-layers of that layer will be ignored.
Exporting selected elements
The Generate Web Assets command will look through every element on the current state and export any element or layer that is named with an image extension. If you’ve made changes to only a few elements, you can select those elements and run Generate Web Assets from Selection to export just those elements. If you haven’t exported the document previously, the command will ask you to select an export location. Otherwise, the selected elements will be exported to the previously-used location.
In order to export a layer or sub-layer that is named with an image extension, select a child of that layer. The command will run faster if you select just one child instead of all the children of a named layer, since the command needs to check every element on the state to find the selected child when multiple elements are selected.
Release history
- 0.1.2
- 2013-05-30: Export GIFs with alpha transparency. Hidden elements no longer affect the size of the exported image.
- 0.1.1
- 2013-05-29: Fixed a bug with shared master layers. Fixed a bug with overlapping elements in an exported layer that contains sub-layers. Added a Generate Web Assets from Selection command.
- 0.1.0
- 2013-05-20: First public release.