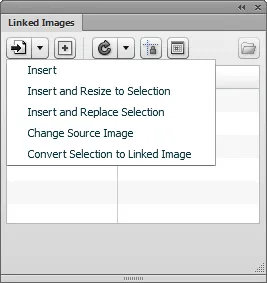
Linked Images

When you import an image into a Fireworks document, Fireworks doesn’t maintain any link between the source file and the bitmap element in the document. If the source file changes, you’ll need to find it, re-import it and then delete the previous image in the document. The Linked Images extension makes this process a little easier.
Other Adobe products in the Creative Suite support a “smart objects” feature, which lets you import objects from one app into another. When the source object changes, the imported one updates as well. Images imported via the Linked Images panel aren’t quite that smart, but they will remember where their source file was. You can then select the imported bitmap and run the Refresh command to re-import the latest version of the source file.
Why not use an external symbol file instead? External symbols work great if the contents of the symbols are created in Fireworks. You can just open the symbol file, edit it, save it, then go to another file where you’ve used the symbol and update it. But what if the source is, say, a JPEG created by someone else using Photoshop? You’d have to open the external symbol file, edit the symbol, delete its contents, find the Photoshop JPEG, re-import it into the symbol, save the symbol file, and then go to the file that uses the external symbol and refresh it.
With a linked image, on the other hand, you’d just have to select the image and run the Refresh command to import the latest version of the source file.
Linked Images panel
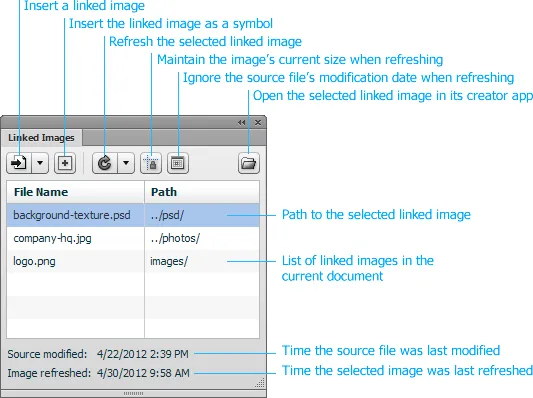
The Linked Images panel lets you insert and manage linked images. To open it, click Windows > Linked Images. The same operations are also available in the Commands > Linked Images sub-menu. You can specify a keyboard shortcut for the items in the Commands menu to get quick access to a particular command.
Inserting a linked image
To insert a linked image, click the Insert button in the panel. An image file browser will open, letting you choose one or more images to import. When you click OK, the selected images will be imported onto the current layer, in the middle of the document. (There’s unfortunately no way to place and size the image by clicking and dragging the mouse, as there is with the File > Import command.)
Each bitmap element is automatically given the same name as its source file. The absolute path to the source file is stored on the element, and will follow it around if you copy it to a new document. If the current document has been saved (i.e., it’s not untitled), then the relative path from the document to the source file is also calculated and stored. When you later refresh the image, the relative path will always be checked first. As long as the relative paths are maintained, it is possible to move the Fireworks document and its linked images to a completely new location without breaking any links.
In addition to flat bitmaps, you can also insert Fireworks files that contain graphical elements: vectors, text blocks, auto shapes, etc. When you insert a Fireworks file, the elements from the first state of the first page are inserted and then flattened into a bitmap; the source file is left unflattened. Note that the background color of the source file isn’t included in the linked image, and the size of the image will be the bounding box of the source elements, not the size of the source document’s canvas.
Refreshing a linked image
Fireworks cannot automatically refresh a linked image when its source file changes, so you’ll need to manually refresh images when you know their sources have changed. When you’re ready to do a refresh, select one or more of your linked images and then click the Refresh button. The source file for each selected image is imported and aligned with the image’s top-left corner. Any effects that you had applied to the image are maintained on the refreshed copy. If you select a group, its immediate child elements will be refreshed, though elements deeper in the group hierarchy won’t be.
The Refresh command first looks for the source file relative to the saved location of the document. If it can’t find the file there, it looks at the original absolute path from which the image was imported. If the image’s source file still cannot be found, an error message will display the list of missing files.
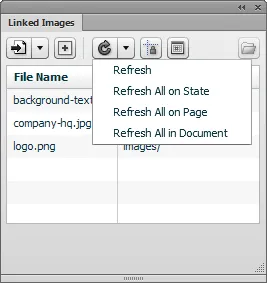
In addition to refreshing just the selected images, you can also refresh every image on the current state, page or document. Click the triangle next to the Refresh icon to display a menu with additional commands: Refresh All on State, Refresh All on Page, and Refresh All in Document. The refresh commands are smart enough to not re-import a source file if its modification date is older than the last refreshed time of the linked image. Still, it’s advisable to make sure the document has been saved before selecting one of these options, in case something goes wrong during a long refresh operation.
If a linked image is embedded inside a symbol, you will need to double-click to edit the symbol, select the image and then click Refresh. After the image has been refreshed, the edit mode for that symbol will be exited.
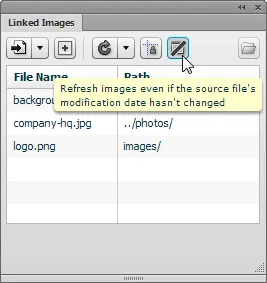
Forcing a linked image to refresh
By default, if the selected linked image has been refreshed more recently than the last modified date of its source file, then the source file will not be re-imported. If you want to force the panel to re-import the source file anyway, click the toggle button with the calendar icon to the right of the Refresh button. When the button is toggled on, the modification dates of the source files will be ignored. Keep in mind that this option may cause the Refresh All on State, Refresh All on Page, and Refresh All in Document commands to take considerably longer.
Maintaining the size of the refreshed image
When an image is refreshed, a copy of the source file is inserted at the source file’s current size, which may be different than the current size of the image in the document. If you would prefer to refresh the image without changing its size, then click the Maintain Size toggle button next to the Refresh button. The source file will be resized to fit within the bounds of the current image without affecting the source file’s aspect ratio, which means that it may end up being smaller than the current image.
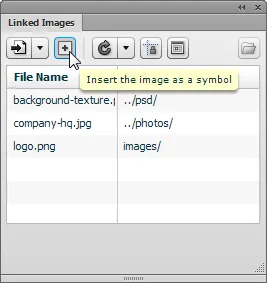
Inserting a linked file as a symbol
If you want to turn the external file into a symbol, click the toggle button next to the Insert button. When the button is toggled on, any insertion operation will insert the linked image as a symbol, rather than as a bitmap. The new symbol will take its name from the filename of the external source.
You can refresh the symbol like any other linked image, simply by selecting the instance and clicking Refresh. All instances of the symbol anywhere in the document will immediately update to display the refreshed image. This will be much faster than using the Refresh All in Document command.
Note that the size of the linked instance is always maintained when it’s refreshed, regardless of the state of the Maintain Size button in the panel. Also, the imported elements are positioned the same distance from the symbol’s origin as they are from the source document’s origin.
When inserting a linked symbol, the contents of the external file are copied into the master symbol. This has the advantage that the original vector elements in the symbol are scaled when it’s resized, which should produce a smoother image than resizing a flattened bitmap, especially when enlarging it. The disadvantage is that the contents of the linked file are copied into your document, making it somewhat larger.
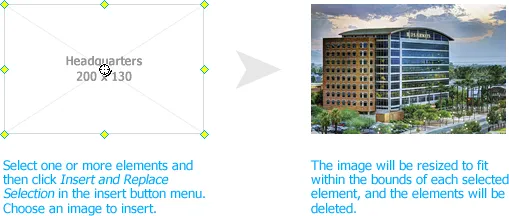
Replacing the selected element with a linked image
Some apps, like InDesign, let you select an element and then insert an image at the size of the selected element. The Linked Image panel lets you do this as well. Simply select one or more elements and then click the triangle next to the Insert icon.
Then select Insert and Resize to Selection, which will prompt you to select an image. A copy of the image will be inserted for each selected element, and then proportionally resized to fit within the bounds of that element. The image will be centered horizontally and vertically on the element.
The Insert and Replace Selection option works the same way, but each selected element is deleted after the image is inserted. This can be useful when you want to replace a placeholder object with the final image. The linked image gets the same name as the element it replaced.
Linked images list
The Linked Images panel displays a list of images that have been inserted into the current Fireworks document, along with their relative paths. This list is stored in hidden data on the first page of the document, so if that page is deleted or moved, the list will be lost.
Older versions of the panel stored this list in an external .json file. That file will be imported and deleted when an old document is opened with a newer version of the panel.
Modifying the image list
The panel doesn’t know when you’ve deleted the last instance of an external file, so the list may display images that are no longer in use in the current document. To clean up the list, select an item in the list and then press the delete key.
Highlighting the selected image
If you select a linked image, its source file will be highlighted in the Linked Images panel’s list. If multiple linked images are selected, more than one source file may be highlighted.
The date and time that the selected image was last refreshed is displayed at the bottom of the panel, as is the modification date of the source file. This can help you determine whether the image needs to be refreshed.
Editing a source file
To edit a source file, you can double-click it in the list of linked images in the panel, or select it and click the button with the folder icon. If the source file is a PNG, it is opened in Fireworks, regardless of what application was originally used to create it. .psd and .ai files will be opened in Photoshop and Illustrator, respectively. When opening a file on Windows, you may see a shell window flash briefly as the image is opened.
Inserting a new copy of a linked image
To insert a new copy of a linked image into the middle of the document, alt-click the image in the list. When the copy is inserted, the setting of the Insert as Symbol button is respected.
Converting elements into a linked file
The Convert Selection to Linked Image command in the Insert button’s menu takes the selected elements, copies them to another file of your choosing, and then flattens them into a bitmap in the original document. This can be useful to let someone else work on a portion of a document, or when you have some complicated graphics that are unlikely to change. Fireworks usually works faster with a single bitmap than many small elements, so exporting the original elements to an external file can speed things up.
Changing the source of the linked file
If you want to point an image at a different external file, select the image and then click the Change Source Image command in the Insert button’s menu. In the file browser, choose a file to replace the selected image.
To see both the relative and absolute paths to a linked image’s source file, run Commands > Linked Images > Source Image - Show Path.
Naming linked images
By default, a newly inserted linked image is given the same name as the file that was inserted, minus the extension. You can add prefixes or suffixes to that name by running Commands > Linked Images > Change Linked Image Naming Scheme. A dialog will prompt you to enter a pattern for image names, which must contain the string {filename}. That token indicates where the filename from the linked image should be inserted into the pattern.
For instance, if you entered [LINK] {filename} in the dialog and then inserted an image called My Photo.jpg, the resulting bitmap element would be named [LINK] My Photo in the Layers panel.
Release history
- 1.2.0
- 2013-01-03: The modification date of the source file is now used to determine whether it needs to be re-imported. A mask on a linked image is now correctly maintained when the image is refreshed. Added the ability to insert a new copy of an existing image.
- 1.1.0
- 2012-06-06: Revamped the controls in the panel. Added the ability to resize the inserted image to the size of the selected elements, and optionally replace them.
- 1.0.0
- 2012-04-30: Added a panel to display the paths of linked images in the current document. Refreshing a linked image symbol now works without going into symbol edit mode. Linked Photoshop and Illustrator files can be opened in their respective apps.
- 0.1.2
- 2012-03-13: Minor update to automatically name inserted images based on their source file.
- 0.1.1
- 2011-02-19: Minor update to better handle linked images that contain multiple states, which are not supported.
- 0.1.0
- 2010-10-25: Initial release.