Lorem Ipsum
Although the Greeked Text auto shape generally suffices for making sketches and early mockups, sometimes you want to display actual formatted text before the final content has been decided. People typically use some form of “lorem ipsum” for this purpose, and the Lorem Ipsum auto shape makes inserting any amount of dummy text a breeze.
There are a number of other Fireworks extensions that work well for initially inserting placeholder text. The problem comes when you need to adjust the amount of text. Perhaps the layout has changed, or the font size has increased so the text is now too long. If all you have is a regular text element, you’ll have to manually edit it to add or remove words in order to make it fit the new layout.
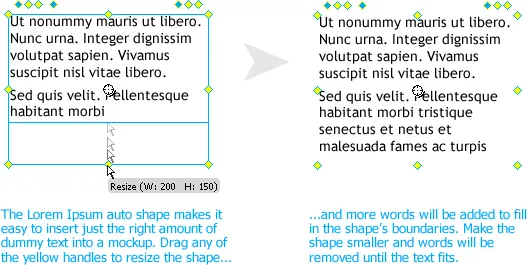
Instead of manual editing, the Lorem Ipsum auto shape lets you simply grab one of its yellow handles to resize it in any direction. If more words are needed to fill the resized text block, the Lorem Ipsum shape automatically adds words. If fewer are needed, it removes words until the text fits.
Creating a Lorem Ipsum auto shape
To create a Lorem Ipsum shape, find it in the Shapes panel and drag it to the canvas. Dummy text is displayed within the shape using the current font, size, and color. The auto shape has 8 yellow control points around its perimeter. Dragging one of these resizes the shape from that edge or corner. When you release the mouse, words are added or removed to fill the shape.
If you press and hold ctrl (command on OS X) before clicking one of these points, they will move only half as fast as the speed at which you drag the mouse, making it easier to make precise adjustments.

Changing text alignment
There is a group of 4 yellow/blue control points just above the upper-left corner of the auto shape. Clicking one of the first three points will set the alignment of the dummy text to left, center, or right, respectively. The blue dot indicates which text alignment option is currently selected.
Toggling paragraphs
To the right of the 3 text alignment control points is a fourth point. Clicking it will toggle paragraphs on (the control point turns blue) or off (the point turns yellow). When paragraphs are on, a return is inserted into the text every few sentences. The first line of each paragraph can be optionally indented, and space can be added after each return. You can control the number of sentences per paragraph and the size of the spacing and indent by clicking the central control point to open the properties dialog, as described below.
Changing text case
There is another group of 3 yellow/blue control points just above the upper-right corner of the auto shape. Clicking one of these will set the text’s case to sentence (the first word of each sentence is capitalized), title (every word is capitalized) or upper (every letter is capitalized).
Randomizing the text
If you duplicate an existing Lorem Ipsum auto shape, the duplicate will have the same text as the original. To produce a more realistic look for the dummy text, you can randomize the duplicate’s sentences. Just ctrl-click (command-click on the Mac) the crosshair icon in the center of the shape whose text you want to change. This will fill the shape with a different set of sentences.
Properties dialog

Click the crosshair in the middle of the Lorem Ipsum shape to open its properties dialog, which offers precise numeric control over the shape’s attributes, as well as additional options that are not available as control points.
Size and Position
In the upper section of the dialog, you can enter a specific size or position for the shape. While you can use the Properties panel to adjust the shape’s X/Y position, you should always adjust its size by directly dragging its control points or by opening its properties dialog. Using the Properties panel or the scale tool to resize the shape will distort the text.
Text
The alignment and case controls described above are also available in the dialog. In addition, you can adjust the line leading here, just as you would in the Properties panel. You can toggle between specifying the leading as a percentage of the font size or absolute pixels.
Show Paragraphs
The bottom section of the dialog offers controls that are not available as control points around the edges of the shape. Click the Show Paragraphs checkbox to toggle paragraph spacing on and off.
- Sentences per paragraph
- The Min and Max fields specify how many sentences can appear in each paragraph. The shape picks a random number between these two values as it creates each paragraph. Make the numbers farther apart to create more random paragraphs. You can also make them the same value to force every paragraph to have the same number of sentences, though since the sentences are all of different lengths, the paragraph heights will still vary.
- Indent
- The Indent field specifies how many pixels the first line of each paragraph should be indented. This value can be negative, which lets you create an outdented effect.
- Spacing
- The Spacing field specifies how many blank pixels should be left after a paragraph break. Set this field to 0 if you do not want any space between paragraphs.
Editing multiple shapes
When multiple Lorem Ipsum auto shapes are selected, resizing one will cause all of them to resize by the same amount in the same direction. This lets you select three columns of text and make them all, say, 20px taller. Changing the width or height in the properties dialog will also set all of the shapes to the specified size.
In addition, you can change the text alignment, paragraph, and text case settings for all of the selected shapes by clicking the appropriate control point on any of the Lorem Ipsum shapes, or by changing the settings in the properties dialog. The other selected shapes will update to match the changed settings.
Note that the last settings you use will become the defaults for the next Lorem Ipsum auto shape that you drag from the Shapes panel.
Changing text formatting
When you drag a Lorem Ipsum auto shape into your document, its font family, size, color, etc. will default to the last text formatting you selected in the Properties panel. If you want to change the text style after you’ve created the auto shape, choose the subselection tool and then click the element containing the dummy text. You should then be able to change the formatting using the standard text controls in the Properties panel.
After you change the selected text block’s style, a warning dialog will likely appear telling you that “Editing sub-elements of an Auto Shape may cause it to behave unpredictably.” That’s often true with auto shapes, but changing the text formatting in the Lorem Ipsum shape is fine. You’ll probably want to select Don’t show again and then click OK.
The shape should then immediately update to ensure that it fits within the desired size. So if you make the font size larger, for instance, the number of words in the auto shape should be reduced.
If you apply a text style to the sub-selected text block and then later update the style, the auto shapes to which the style has been applied should respond to the change by adding or removing words as necessary. (If you have a lot of these styled auto shapes, updating them all may take awhile, as the API calls for editing text are very slow.)
Note that you cannot style individual words in the dummy text, nor edit the text in any way. Any changes you make to the text block will be lost. If you’d like to use the auto shape’s dummy text as a starting point for further editing, select the shape and then click Modify > Ungroup. You’ll be left with an invisible rectangle, which you can delete, and a text block, on which you can perform further edits.
Lorem Ipsum auto shape tool
In addition to dragging a Lorem Ipsum auto shape from the Auto Shapes panel, you can also use the Lorem Ipsum tool in the Tools panel to create dummy text. Click and hold the Rectangle button in the panel to show a list of other shape tools, then select Lorem Ipsum tool. With the tool selected, dragging out a rectangle and then releasing the mouse will insert a text block with the same size and position.

Compatibility
Due to bugs in earlier versions of the application, the Lorem Ipsum auto shape works only with Fireworks CS4 or later.
Release history
- 0.2.0
- 2013-03-20: Added a properties dialog, allowing changes to the line leading, paragraph spacing and indents. Show a random number of sentences per paragraph. Sped up the calculations of how much text fits in the shape.
- 0.1.2
- 2012-06-08: Renamed the shape in the Auto Shape Tools folder to work around a Fireworks bug. Fixed a typo in an alert.
- 0.1.1
- 2011-02-27: Added support for the auto shape tool and changed the minimum Fireworks version requirement.
- 0.1.0
- 2011-02-17: Initial release.